
Training links are provided in this PDF:
EDIS allows you to self register at www.electricalcertificates.co.uk. After registering you will receive a email requesting you to confirm receipt of the email. If you do not receive the email check your SPAM folder or if you still cannot find the confirmation email then try registering again, you may have made a typo in your email address.
If you have forgotten your password – simply request a password reminder – here’s the link – https://edis.electricalcertificates.co.uk/forgot-password
If you are locked out of your account, your account is locked or a locked account prevents you from login in, usually due to multiple failed login attempts, you should request a password reminder. This will unlock your account – here’s the link – https://edis.electricalcertificates.co.uk/forgot-password
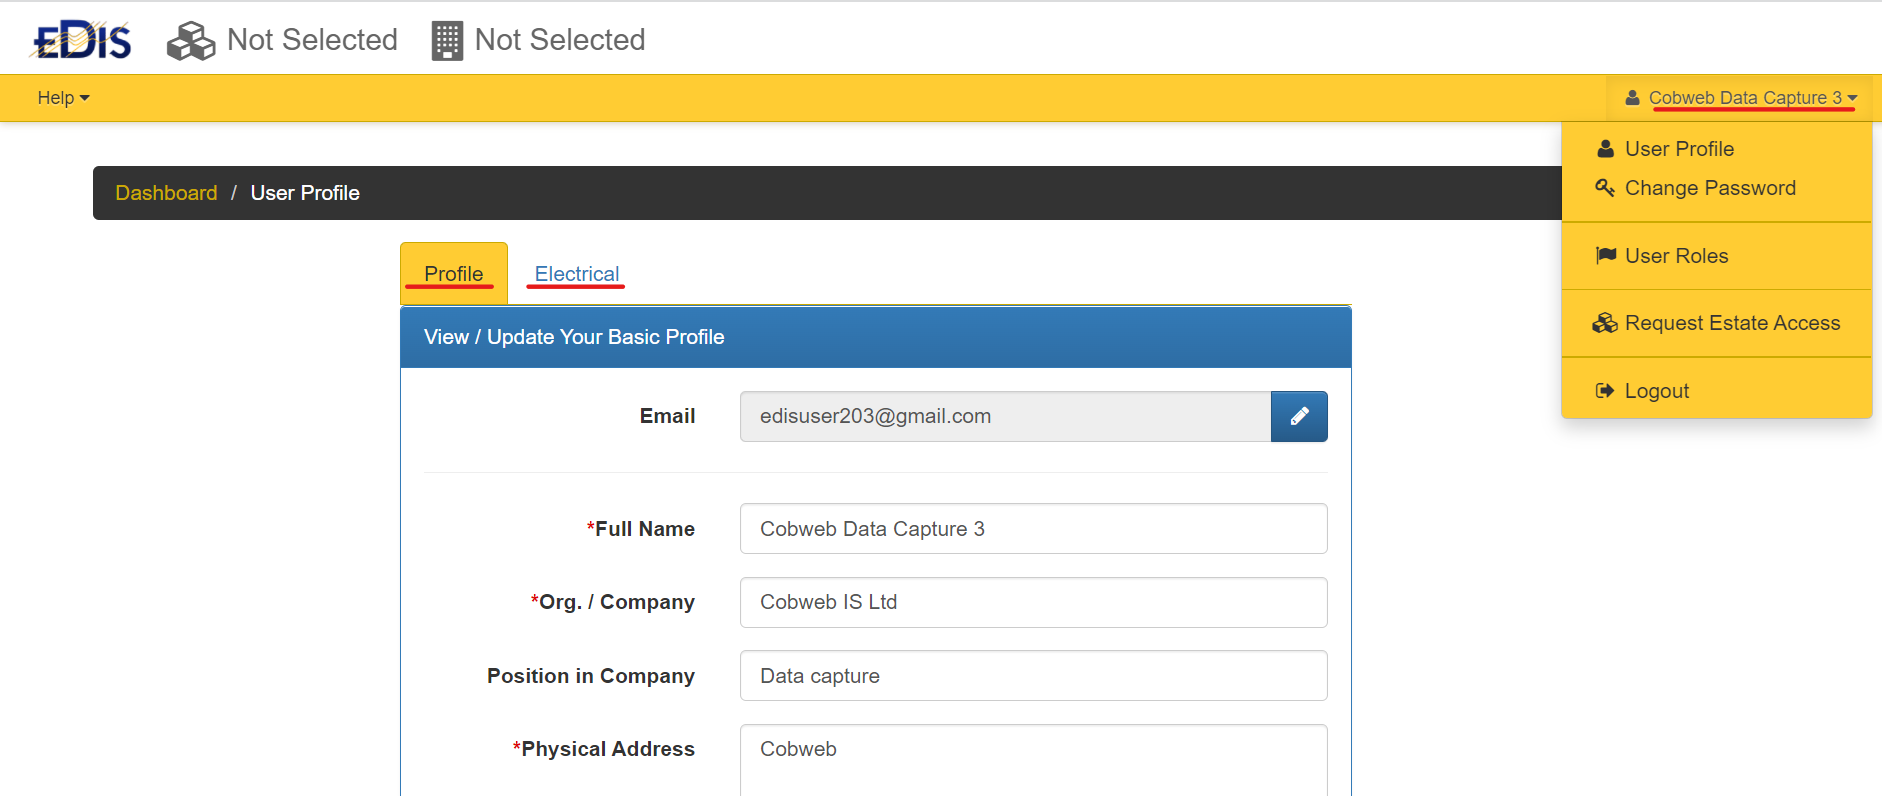
How to change my email? To change your email, log into EDIS and click on your profile menu option on the top right hands side, Select the “User Profile” option and edit your email address, by clicking on the ‘pen’ icon.
To create a new building you need to be a Building Administrator. The existing building administrators are show on the EDIS Dashboard page – this is the landing page after login in.
The Building Administrator can click on Estate Administration on the main menu and then select the Manage Buildings option, from there the Building Administrator can create a building or edit building details.
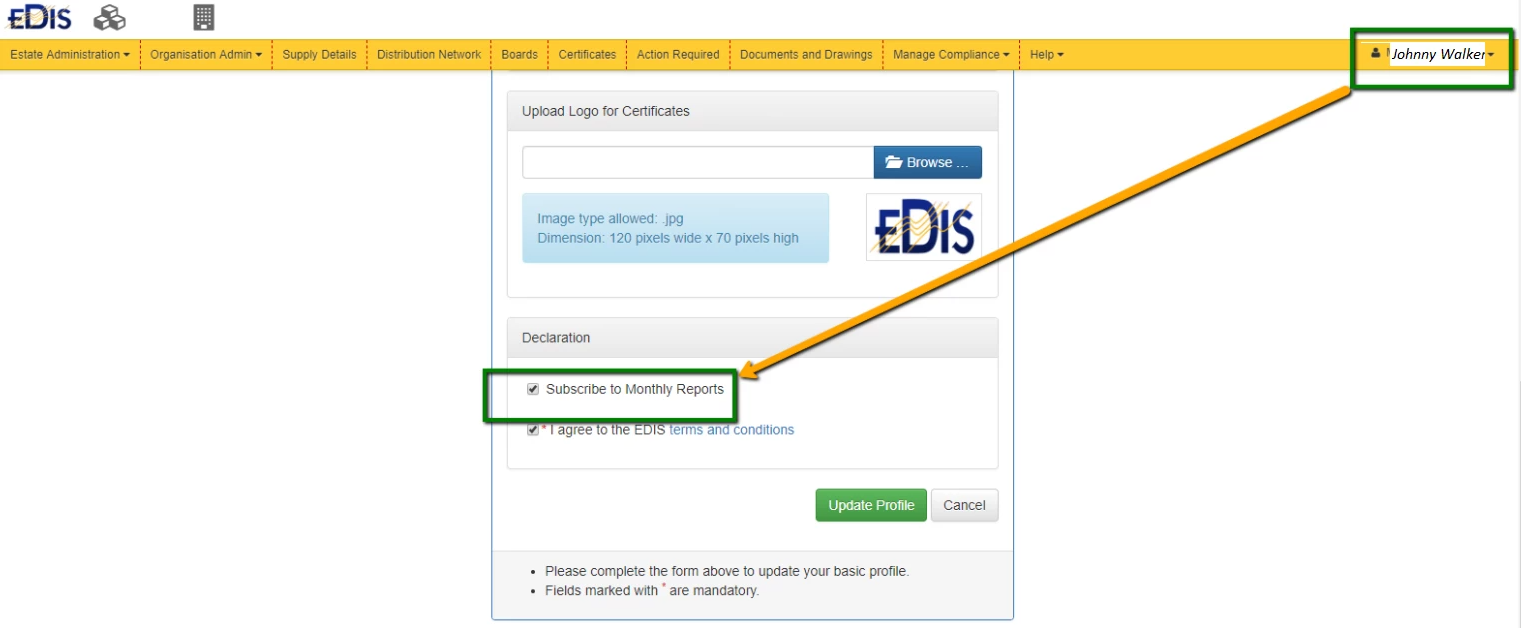
To receive monthly email reminders, login and then click on your name on the top right hand side of the screen. Your profile page will open, at the bottom of the page tick the box ““.
To sign off a certificate:
- Login and select the building
- Click the Certificates menu option
- Find the certificate you need to sign off and select Edit from the dropdown
- Goto Step5
- Tick the Contractor Completion Authorised box
- Click Finish button
- Goto your email and confirm the sign off via email
Here is a full guide to creating and completing certificates
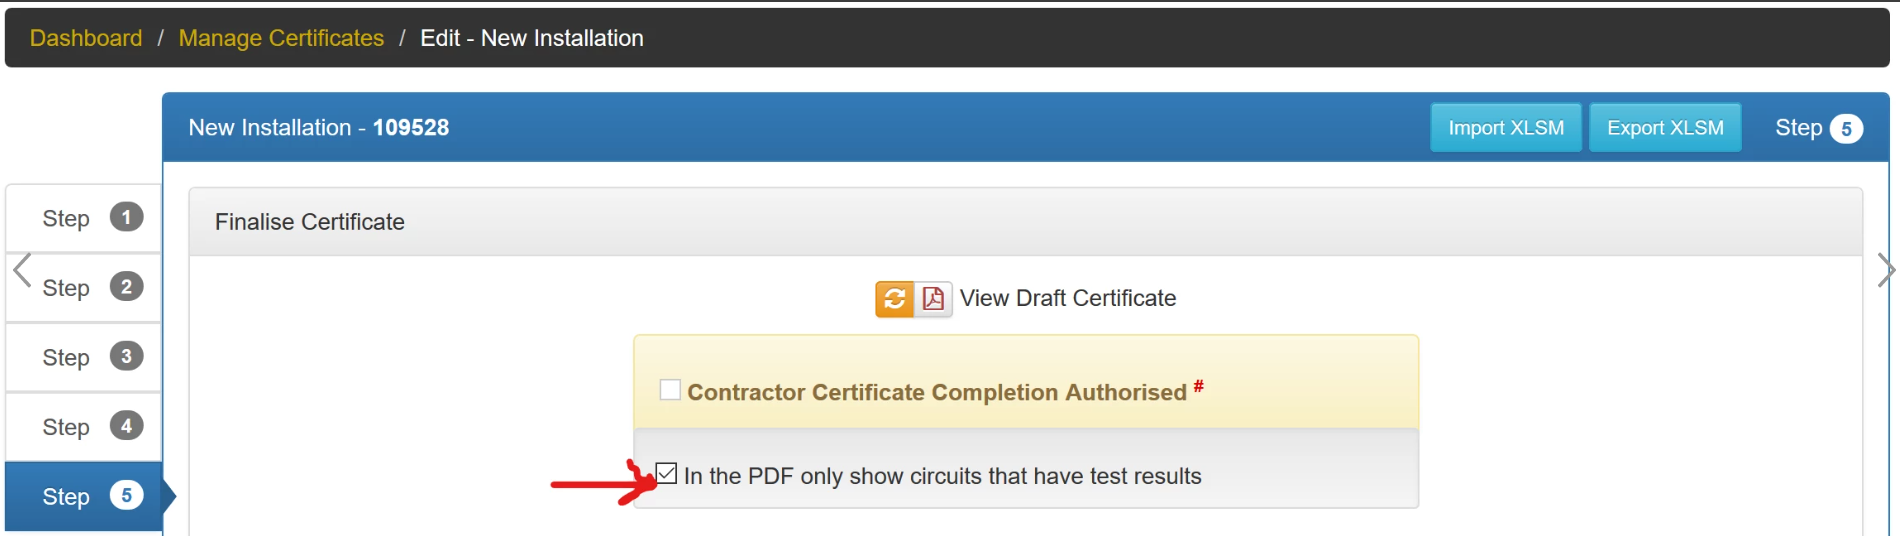
New installation works often only modify a single circuit in a board. Creating a New Installation certificate in EDIS displays all the circuits in the board. If you only want to display the circuits that you have worked on, then, on Step 5, before certifying the certificate, you should ticket the box “In the PDF only show circuits that have test results”.
This will reduce the size of the certificate, only display the required information – in the background the DIstribution Board schedule will be updated and will retain all the circuits.
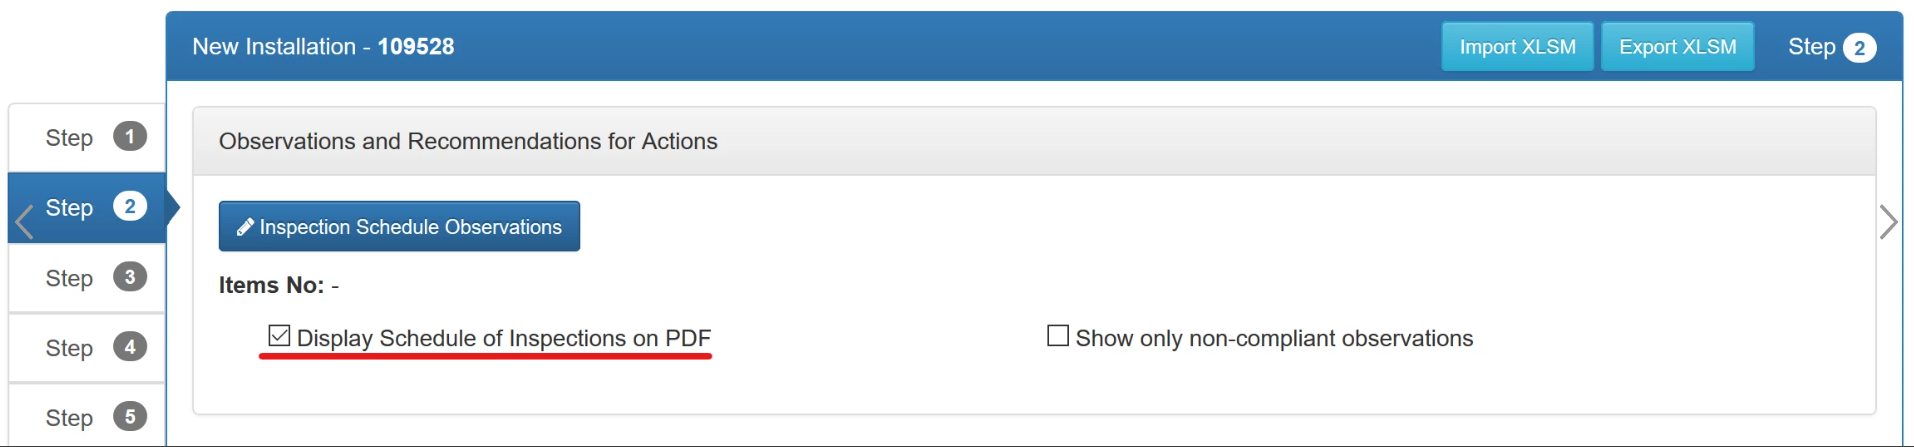
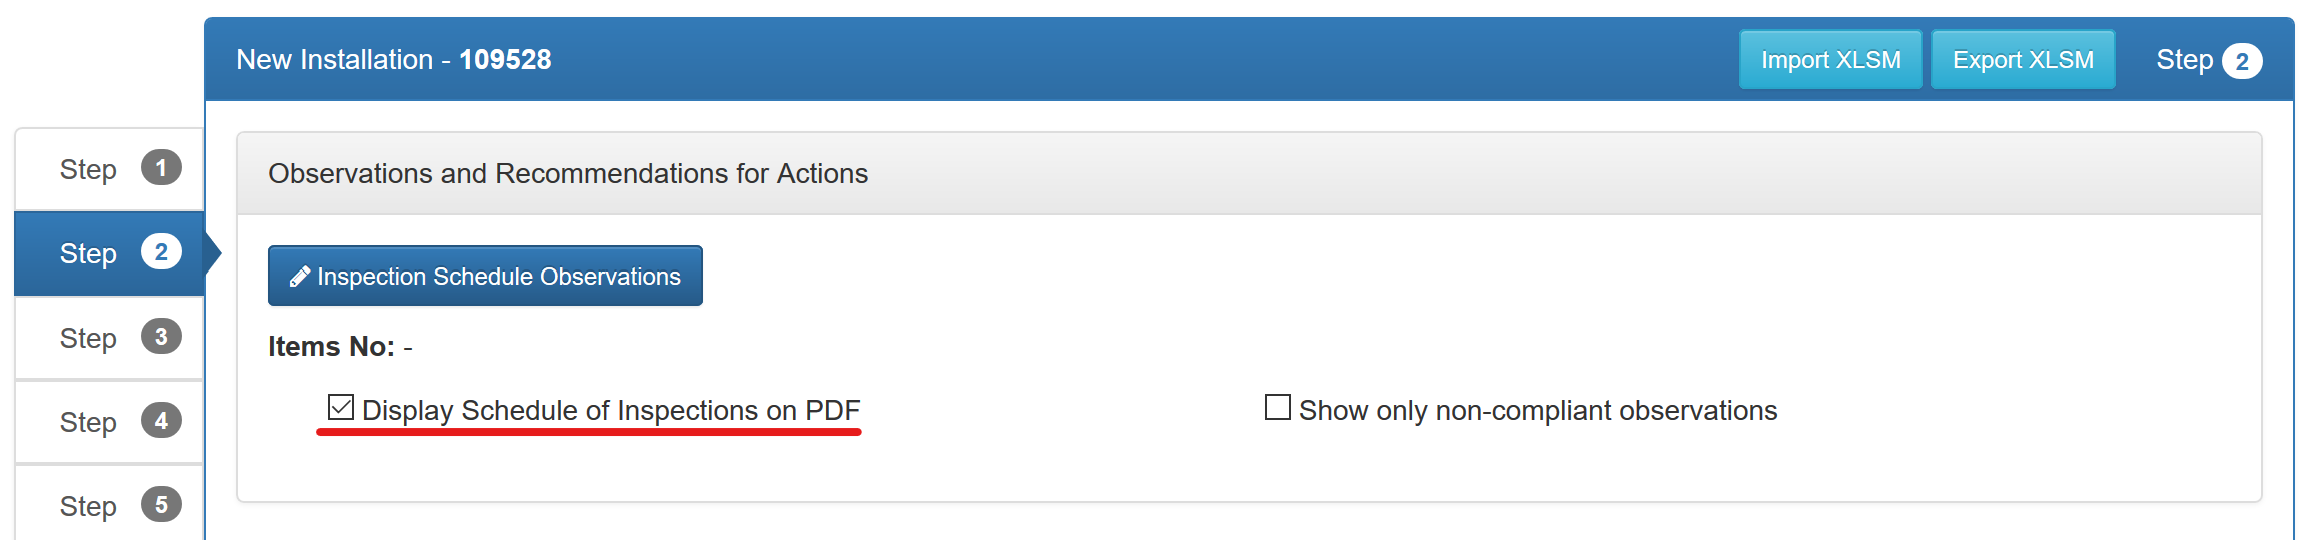
In larger buildings, where ongoing installations and testing takes place, the Schedule of Inspections may not be required. The BS7671 standard states the schedule of Inspections applies to “FOR NEW INSTALLATION WORK ONLY) FOR DOMESTICS AND SIMILAR PREMISES WITH UP TO 100 A SUPPLY”.
remove the tick from the “Display Schedule of Inspections on PDF” tick box, the Schedule of Inspections for a certificate will be supressed in the EDIS certificate PDF.
This reduces the size of the certificate and also removes unnecessary information. Leaving the tick in place will result in the Schedule of Inspection pages being shown in the PDF.
The building administrator can approve access requests to a building; for this reason,it is an important role and should only be limited to key users. The person creating an estate becomes the Estate Administrator(EA) and by default the first Building Administrator (BA).
New Building Administration (BA) permissions is a 3 step process:
1) Select the Personal options/ Request Estate Access menu option:
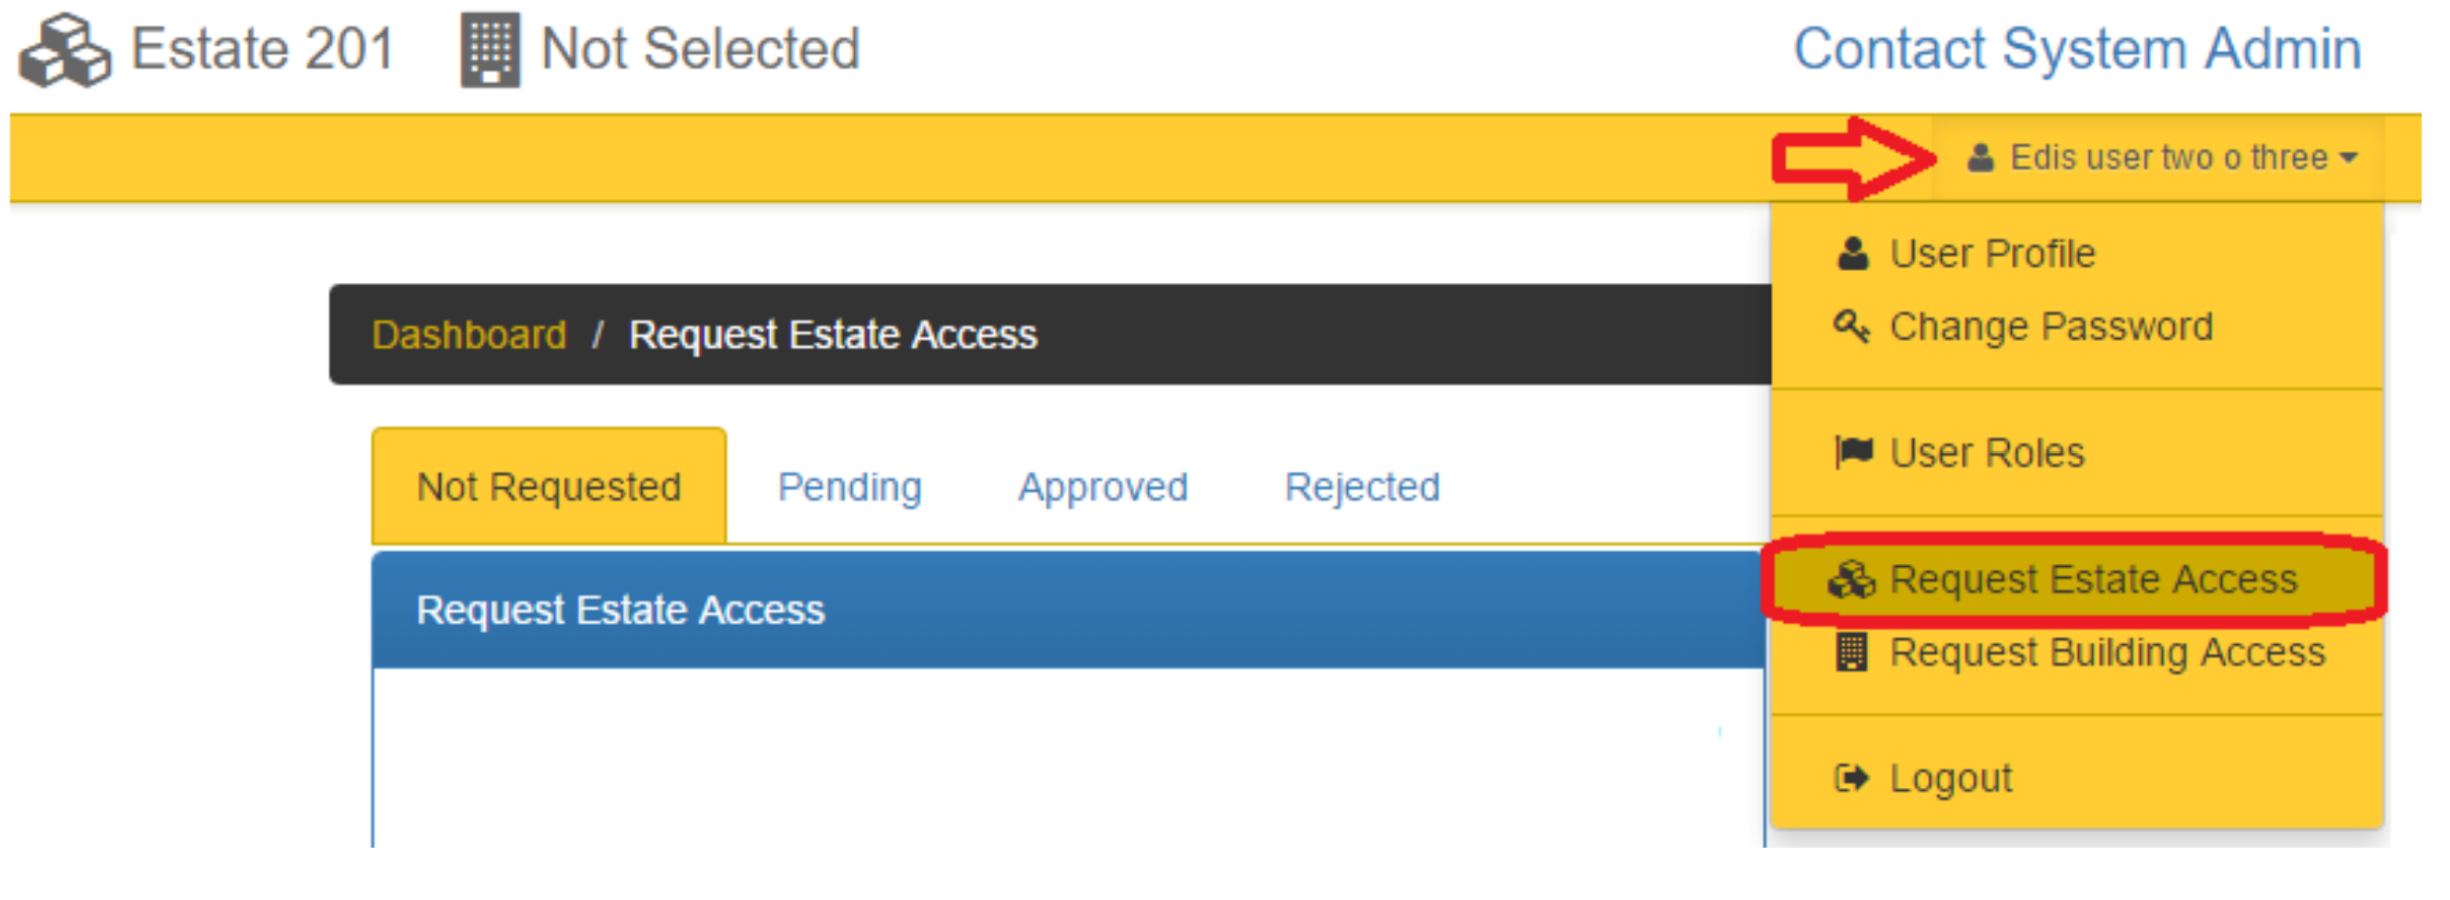
2) The user needs to select the Estate and requests the Building Administrator rights.
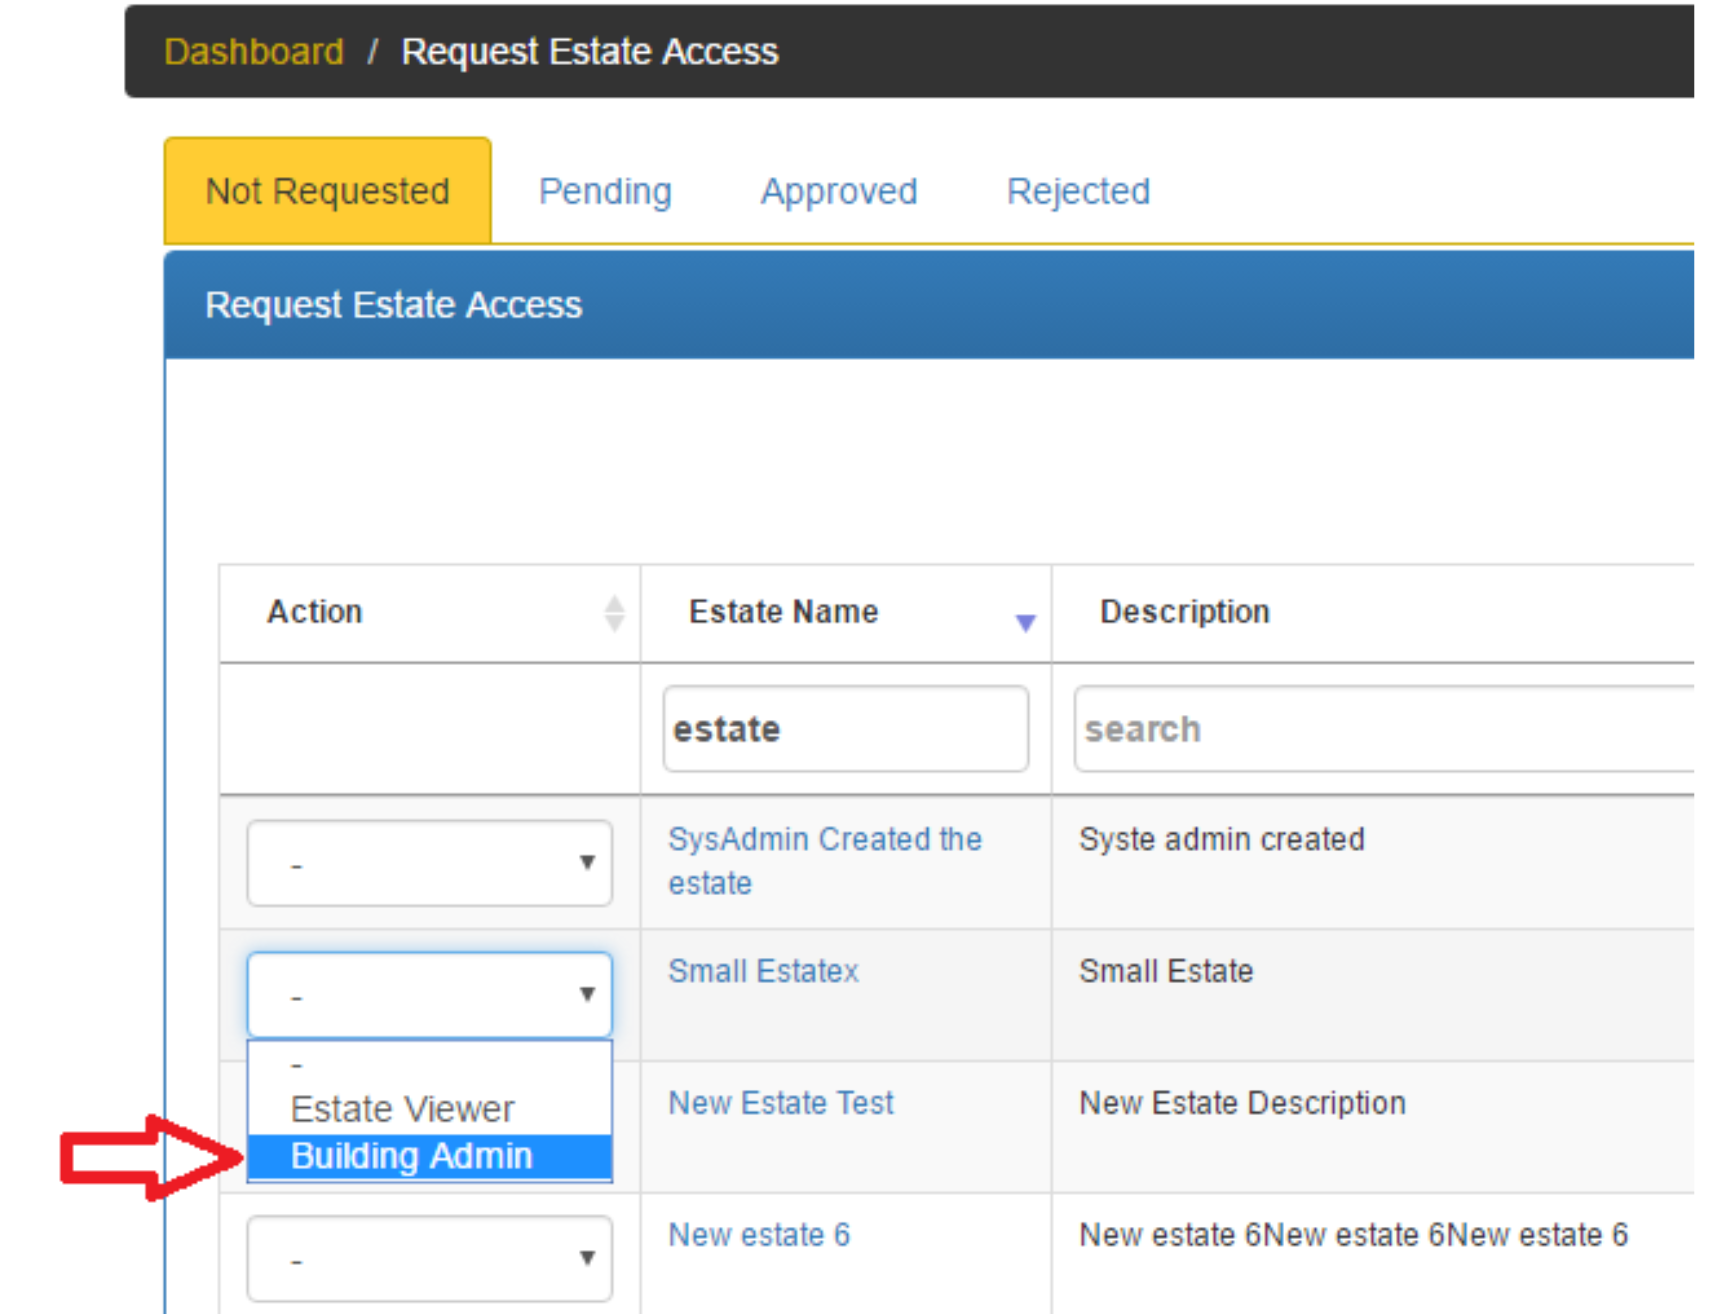
3) An email will then be sent to the existing Building Administrators requesting approval.
In larger buildings, where ongoing installations and testing takes place, the Schedule of Inspections may not be required. The BS7671 standard states the schedule of Inspections applies to “FOR NEW INSTALLATION WORK ONLY) FOR DOMESTICS AND SIMILAR PREMISES WITH UP TO 100 A SUPPLY”.
remove the tick from the “Display Schedule of Inspections on PDF” tick box, the Schedule of Inspections for a certificate will be supressed in the EDIS certificate PDF.
This reduces the size of the certificate and also removes unnecessary information. Leaving the tick in place will result in the Schedule of Inspection pages being shown in the PDF.
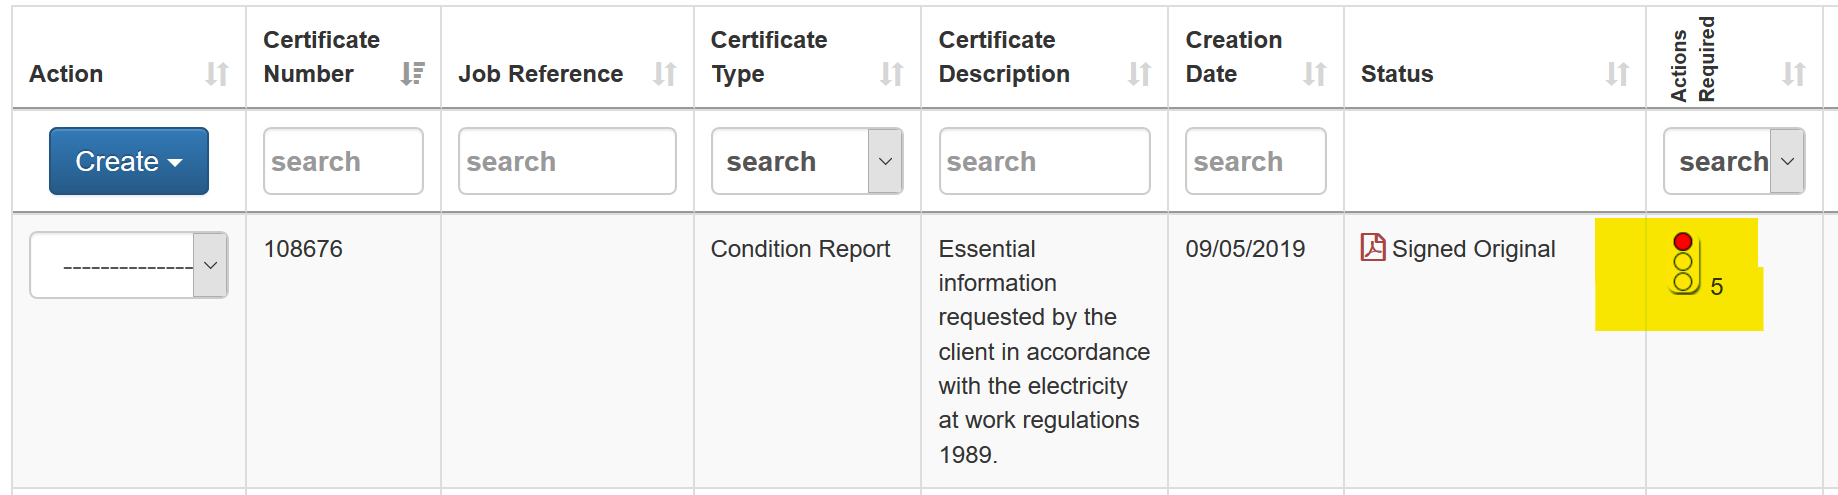
The traffic light only appear AFTER a certificate has been complete and signed of by the tester.
The traffic light has – the Red, Amber or Green Colour and the number.
- RED traffic light indicates that the overall certificate assessment is unsatisfactory
- GREEN traffic light indicates the overall assessment is Unsatisfactory and the Remedial work has been done OR the satisfactory overall assessment
- AMBER indicates Satisfacotry but work reccomended
The number indicates the number of remedial tasks that remain open and need to be closed in the Actions Required list.
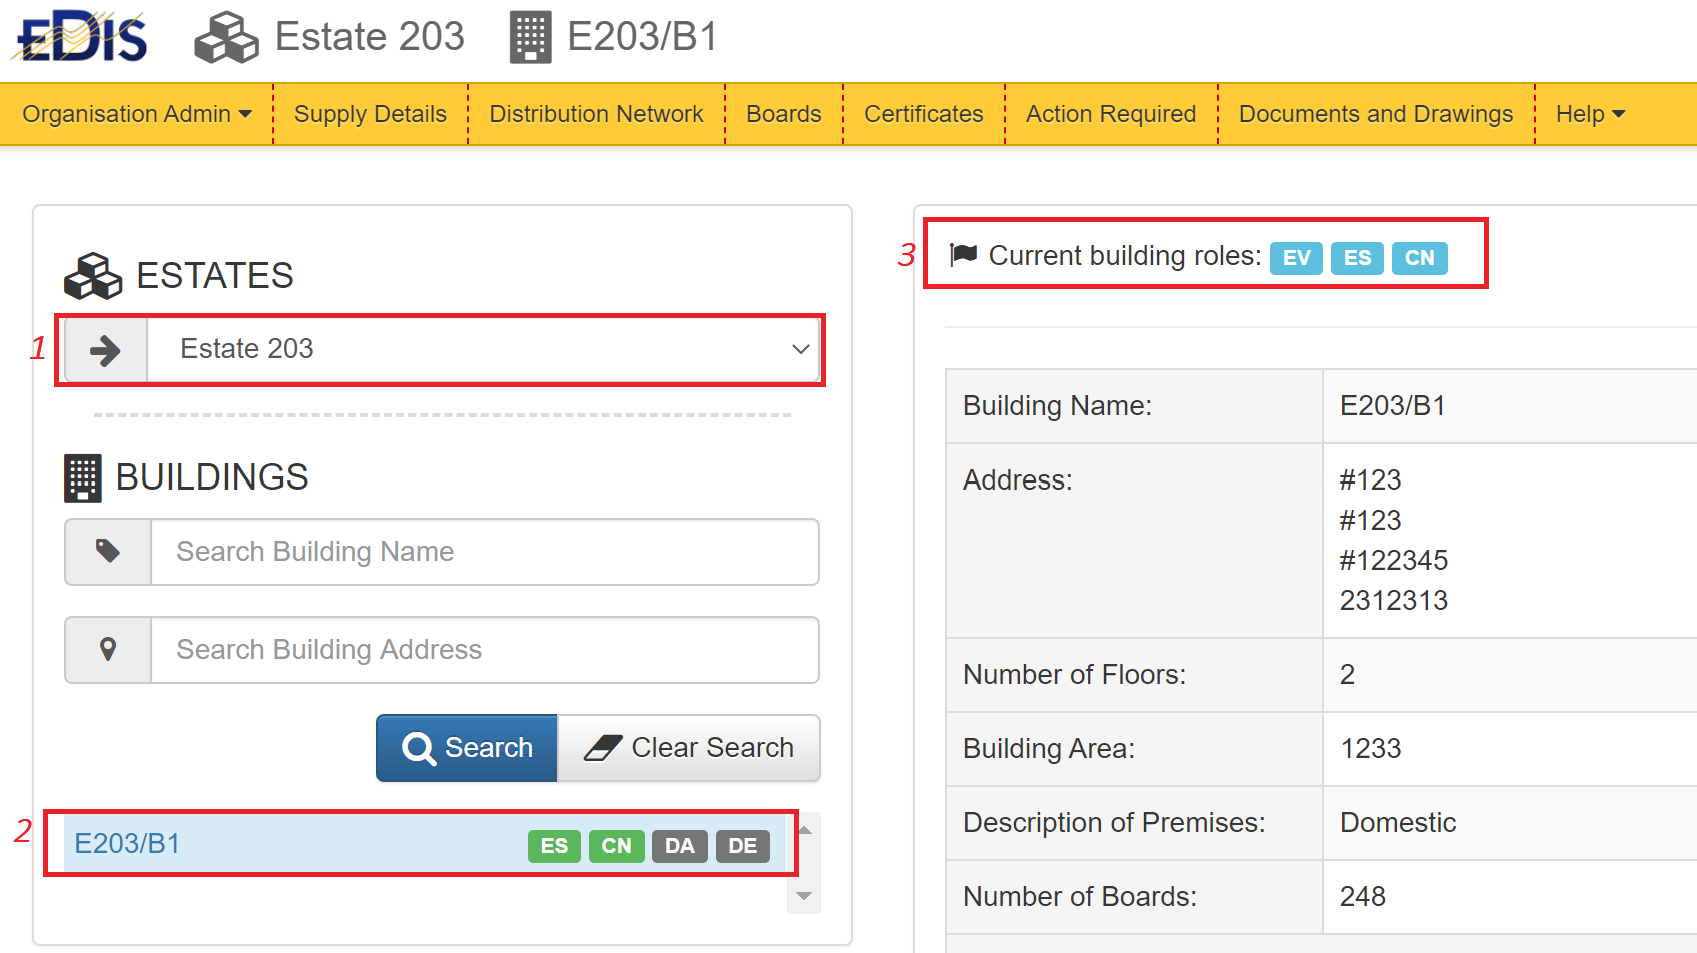
Each EDIS user requires permission to access an Estate and Building, permissions can be requested by the user and must be approved by the Building Administrator.
Permissions ensure that thee right person has access to the right data,
The screenshot below highlights the permission in the building:
- The estate is selected
- Click on the Green box to request additional permissions
- Lists the current permissions
Some examples
Example 1:
- If a user does not have access to an estate they will not be able to see any buildings in the estate.
- If a user does have access to an estate, but does not have access to a building, they will not be able to see data in the building.
Example 2:
- If an electrician creates a certificate – only they will be able to sign it off, other users cannot sign off the certificate. The electrician may opt to have a data administrator assist with capturing the data – this means the data administrator can edit the data, but only the electrician can sign it off.
Example 3:
- The electrician will select the Qualifying Supervisor and after the electrician has verified the certificate it can then be approved/rejected by the supervisor. After the certificate has been approved – it is locked no longer editable/
Example 4:
A building administrator can approve estate and building access – based in the roles in the table below
Requesting access training videos
The table below explains each permission:
| Permission name | Permission Abbreviation | Permission scope |
|---|---|---|
| Estate Administrator | EA | When a user creates an estate the user becomes the Estate Administrator. There can only be one Estate Administrator. The Estate Administrator is by default a Building Administrator, and can approve Building Administrator permissions. An estate requires at least one Estate Administrator. |
| Building Administrator | BA | The building administrators are approved by the Estate Administrator. Building administrators can approve estate and building access when requested by a user. This is an important role and should only be approved after careful consideration by the existing Building Administrators. |
| Estate Visibility | EV | When a user has requested Estate Visibility, they are able to view the buildings in the estate, but have no access to the buildings. Access to each building must be requested, this can be done on a building by building basis or can be assigned to all buildings at the same time (bulk permissions). |
| Contractor | CN | The contractor permissions allow users to create certificates and request the sign-off by the Electrical Supervisor. The contractor permission cannot edit distribution board schedules directly – all changes to a distribution board schedule must be done by creating a certificate and approving the certificate. After the certificate has been completed the distribution board schedules will be automatically updated. |
| Electrical supervisor | ES | The electrical supervisor permission is primarily used to verify a certificate as a Qualifying Supervisor. The electrical supervisor can approve or reject the certificate. The electrical supervisor can also edit distribution board schedules directly. |
| Designer | DE | The Designer role is primarily used to sign off a New Installation design. The Design role is also useful when giving users Read only permissions. If a client wants to view the EDIS data, they should request access to the estate and then be given DE permissions. This will allow them to view (read only) data without changing it. |
| Data Administrator | DA | The data administrator role is provided where the electrician needs assistance in capturing data, this role can edit certificate data, but cannot sign off the certificate. It is a useful role but needs to be approved with due care. |
TABLE: EDIS roles and permissions
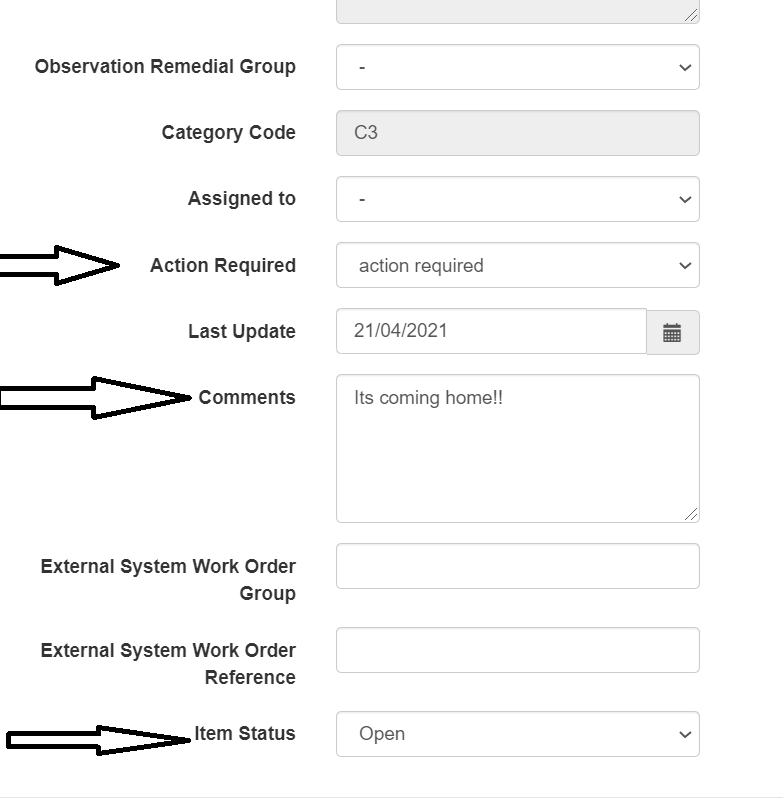
When a electrician inspection condition report (EICR) is created the electrician includes Observations and Recommendations, these are essentially remedial works and become Actions Required in EDIS, You can find the list of Actions Required in the Actions Required menu option.
An unsatisfactory EICR is always accompanied by follow up Actions Required.
There are two parts to the Action Required:
1. The part that was created in the certificate by the electrician, this cannot be changed, because it is part of the certificate and is required for the record.
2. The changes and updates to the Action which are allowed after the certificate has been completed:
To close the action, update and save the following details in the Action Required:
- Action required = Resolved
- Comment= Enter a comments and job reference/description
- Item status= Closed
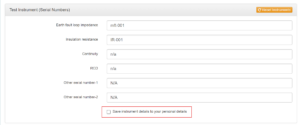
All your user profile details are found in your User Profile; you can edit the details by clicking on the link with your name on the far right hand side of the EDIS menu, then select User Profile option:
The details that can be edited include all details that may relate to you :
- email address
- organisation address or company address
- NICEIC number
- Test instrument serial numbers
- Organisation logo
- You can also assign a PIN number if you need to read multiple QR codes from your phone
- Details of Approved Contractor
EDIS is a multi user system and allows teams to collaborate when managing the electrical test and other data:
The EDIS system allows a teams to collaborate and work on a single certificates test data. To do this your team will need to have Data Admin permissions on the certificate.
To request Data Admin (DA) permission go to the Dashboard page and click DE box that is shown next to the building name.
The Building Administrator can then approve the request.
You can work in the following ways:
1. Edit via the browser- this is multi user so multiple users can work on it at the same time
2. Upload Excel sheets for a board, you should only upload a single sheet at a time, unless you are sure of the result.
3. The mobile app
WARNING
WHEN UPLOADING AN EXCEL SHEET IT OVERWRITES THE EXISTING DATA. SO THEY SHOULD ONLY UPLOAD A SINGLE BOARD AT A TIME.
FOR OBSERVATIONS SHEET; IF IT IS UPLOADED IT OVERWRITES THE EXISTING OBSERVATIONS
TO BE SAFE ALWAYS ENSURE YOU SAVE YOUR EXCEL DATA, THEN IT CAN BE EASILY RELOADED IF IT HAS BEEN OVERWRITTEN BY SOME ONE ELSE.
I am trying to remove my old logo and replace with a new one but can not see how to remove the old one when the new one is added it appears to be in addition to the old one please can you assist:
There are two logo’s within EDIS:
– The estate Logo – this can be changed via the Manage Registered
States in the Admin Menu
-The contractor/electrician login – thi can be changed via the edit
User Profile pages
An organisation member can edit a colleague’s certificate, but cannot sign off the cert, IF they have Data Admin permissions in the building and IF the certificate is associated with the Organisation
For example: If User A is a member of an organisation and User B is the ES and CN for a certificate, and the cert is associated with the organisation, User A will be able to edit the certificate, but not sign it off.
If this is not working as expected, then follow these steps:
User A: Check that User A belongs to an Organisations (in View user profile).
Check that User A has Data Admin permissions in the building (DA) (on Dashboard page).
User B: Check that User B assigns the certificate to the organisation (in edit certificate)
RESULT : User A can edit the cert because they are a member of the Organisation AND have DA permissions in the building
Toggle Content
The error you’re seeing:
e.g. AADSTS7000112: Application ‘1f4546b1-1f29-40a7-ad42-c0ad6e8fd05d’ (EdisAccessUsingMicrosoftAuthentication) is disabled
means that you need your IT Support to enable the EdisAccessUsingMicrosoftAuthentication) in Microsoft Entra (formerly Azure Active Directory).
🔧 How to Fix It
Your IT Support team need to resolve the issue -here is a handy template to send to the IT team to resolve this issue : email template
You can then use this template to create many different boards. Each board must have a unique Distribution Board Reference.
These Excel workbooks can then be uploaded to EDIS .
An alternative approach is to Bulk create the boards and then bulk edit the circuits:
When is certificate is completed it needs to be signed off this is done as a 2 step process by clicking a button in the web portal and by clicking a link in an e-mail that is sent to the signatories. The user can click one of two links accept or reject:
- If the certificate is accepted a PDF is generated and the database is updated copy of the PDF is also emailed to the signatories
- if the certificate is rejected it then becomes editable and you can go back into the eaters portal and make the required changes before attempting sign off again.
It is not possible to edit a completed certificate the completed certificate will need to be reverted back to draft status if it needs to be edited. Only the building administrator convert a certificate back to draft. As an administrator the revert to draft is done in the manage certificates menu option, in the action column select revert to draft.
Using the profile link on the top right hand side allows you to edit your details:
The following can be entered or updated via the profile link:
- General section
- Name address, organisation and telephone number
- New or updated email
- Password changed
- Electrical section
- Accrediting body details, e.g. NICEIC
- Test instrument serial numbers
DONT FORGET TO SAVE BEFORE EXITING!
If a user scans a lot of QR Codes in a short period of time EDIS will request a code; this code can be set in the user profile “Pin for Q Code” section. To set the code you will need to login and click your profile to access the form where you can set the code.
Toggle Content